How to draw ray diagrams for convex/converging lenses GCSE Physics Revision


To draw an accurate ray diagram to figure out where the image will be formed, you need to follow these three rules:


1. Draw a ray from the top of the object that goes parallel to the principal axis (the line going horizontally through the centre of the lens). When the ray hits the lens, it then changes direction and passes through the focal point on the other side of the lens.

2. Draw a second ray that goes straight from the top of the object diagonally through the centre of the lens without changing direction.

3. Draw a third ray that passes from the top of the object, through the focal point on the left hand side of the lens and then changes direction when it hits the lens so that it travels parallel to the principal axis (straight line going through the middle) on the other side.

Edexcel Physics Controlled Assessment Secondary data - Collisions and momentum


This experiment is all about conservation of momentum and collisions.

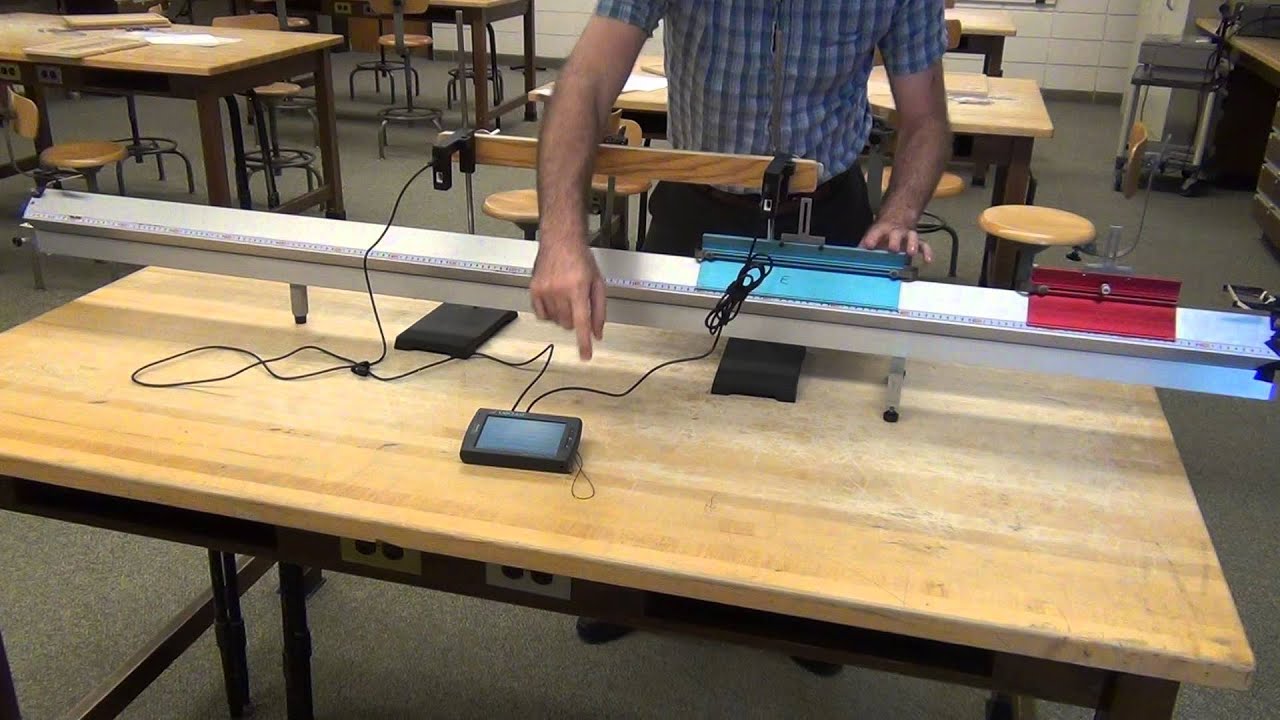
First, an air track is set up which provides a frictionless surface. A glider of fixed mass is placed on the air track and has a card fixed on to the top of it. The purpose of the card is to cut through the beam of the light gate.

The mass of the second glider is measured and pushed so that it collides with the first. The velocities before the collision and after the collision are measured.

The experiment is repeated, confirming the principle of the conservation of momentum. Our results showed that the bigger the mass of the second glider, the more momentum it had. This meant that the combined momentum of the first and second glider (they stick together) after the collision is larger and the velocity is higher. Results are shown below:

Momentum Before (Kgm/s)
Momentum After (kgm/s)
0.2544345
0.2350898
0.3193965
0.3419488
0.2549345
0.2244039
0.2598480
0.2326603
0.2111256
0.2052885


GCSE Science Chemistry ISA Method Viscosity


Hypothesis

The viscosity of oil depends on its temperature.


Equipment


  • Vegetable oil in a test tube
  • Beaker
  • Thermometer
  • Pipette
  • White tile
  • Ruler 
  • Clamp stand, boss and clamp
  • Stopwatch
  • Hot water/kettle

Method

Boil some water in a kettle and pour it into a beaker. Place the test tube of vegetable oil into the beaker and a thermometer into the test tube. Wait a few minutes until the oil has reached the same temperature as the hot water. Angle a white tile so it's sloping downwards and is held securely by a clamp stand. Using the ruler mark a line 5 cm long going straight down the tile. Take the pipette and fill it with oil, releasing it on the top of the line on the tile. Using the stopwatch, time how long it takes for the oil to flow down the tile and travel 5 cm. Record this time. Let the oil in the test tube cool slightly and repeat for a range of temperatures.


Variables

Independent - temperature of oil
Dependent - time taken to flow down tile (the more viscous the oil, the longer this will take)
Control - Angle of tile, volume of oil, distance oil flows (5cm)


Risk assessment

This is a very safe experiment but care must be taken handling the hot water from the kettle. The risk is low but goggles should be worn when pouring hot water.

A great way of learning about Science and Technology is through playing with Lego. Find out more about hiring Lego for your parties or events at https://www.lab-awesome.co.uk  and how Lego can be used to support STEM at www.beyondawesomebricks.com. 

Physics in video games

If you feel like taking a break from all your ISA preparation, try watching the youtube video below. It explains how Physics, similar to what you study in school is used in video games and gaming.


And this is a demo of the Physics engine that is used in GTA 4:


GCSE Science Physics ISA method Water Cooling controlled assessment

Hypothesis

The temperature decrease of hot water in a container, after a fixed period of time, depends upon the starting temperature of the water


Equipment


  • Beaker 
  • Thermometer
  • Electric Kettle
  • Stopwatch

Method

Pour hot water from the kettle into the beaker and record the starting temperature. Leave the beaker for 5 minutes and record the temperature it has cooled to. Repeat the experiment with 5 other starting temperature of water.


Variables

Independent - starting temperature of water
Dependent - final temperature of water
Control - volume of water, size and shape of beaker, room temperature


Risk Assessment

This is a low risk assessment but you must take care handling hot water from the kettle to avoid burns and scalds.

GCSE Chemistry ISA Controlled Assessment Ions that cause Hard Water


Hypothesis

Group 2 metal ions cause hardness in water


Equipment

  • 6 samples of water each containing different metal ions
  • Soap solution
  • Conical flask (small)
  • Pipette
  • Measuring cylinder

Method

Take the first sample and pour 10 centimetres cubed of it into the conical flask. Add 1 cm cubed of soap solution using the pipette, put a stopper in the top of the conical flask and shake the flask for 10 seconds. Observe the lather that's formed on the top of the water - if it lasts for longer than 1 minute then we can consider it to be a permanent lather and we can record that. If the lather fades away after less than a minute add another centimetre cubed and repeat. Keep doing this until the lather does persist for at least a minute. Record how much soap solution was required to produce a permanent lather with that metal ion present and repeat the whole process for the remaining metal ions.


Variables

Independent variable - type of metal ion
Dependent variable - Volume of soap solution required to produce a permanent lather
Control variable - Amount of shaking, type of soap solution used, type of flask used


Risk Assessment

This is a very safe experiment (i.e. low risk). Care must be taken with spillages and they must be wiped up immediately.


GCSE Biology ISA Lungs

Hypothesis

The taller a person is the larger the maximum volume of air that the person can breathe out of that person's lungs is.


Equipment


  • Large, callibrated (with a scale marked on) container
  • Wide plastic tube
  • Sterilised mouthpiece (with supply of sterilising solution e.g. Milton)
  • Large bowl of water
  • Metre rules

Method

Fill the large container with water and turn upside down so that the opening is under water in the large bowl. Thread one end of the plastic tubing into the large container. Either attach the sterilised mouthpiece to the other end of the tubing or sterilise the end of the tubing directly. Record the height of the first volunteer using the metre rules to measure this. Get your first volunteer to pinch their nose and breathe in and out deeply several times. Now, get them to take a deep breath in  and exhale deeply into the tube/mouthpiece. Using the scale on the side of the container, record how much air has been breathed out into it. Repeat these steps for another 5 volunteers.


Variables

Independent - Height of person
Dependent - Volume of air breathed out
Control - Diameter of tube, temperature of air, position of person (seated/standing), pulse rate of person


Risk Assessment

The risks in this experiment are low but care must be taken to ensure the mouthpieces and tube are properly sterilised between uses. This will prevent any infection/germs being spread from one person to the next.


For a bit of extra background reading try https://en.wikipedia.org/wiki/Lung_volumes

GCSE Biology ISA Acid Rain Method


Hypothesis

The higher the concentration of acid in a solution used to water seeds, the less the seeds will grow.


Equipment

  • Seeds
  • Distilled water
  • Sulfuric acid (dilute)
  • Measuring cylinders
  • Filter paper
  • Petri dishes
  • Beaker
  • Pipette
  • Ruler

Method

Start by pouring 40 cm^3 of the distilled water into the beaker. Place 3 small discs of filter paper into the petri dish, fill with water and then empty (into the sink). Spread a few seeds on the filter paper. Put the lid on the dish and label. Repeat this process for the other petri dishes but each time replace 1cm cubed of the distilled water in the beaker with 1cm cubed of the sulphuric acid. For example, the second set of readings will be with 39 cm cubed of water and 1 cm cubed of sulfuric acid. Once this is done for several dishes, leave them in a warm place (a window ledge would be ideal) for 24 hours. For each set of seeds, record how many seeds have produced leaves (and any other relevant observations you can make).


Variables

Independent - Concentration of acid
Dependent - Growth of seeds
Control - Number of seeds planted, type of seeds planted, amount of light/temperature seeds grown in.


Risk Assessment

This is a very low risk experiment. Care should be taken when handling the acid - a pipette should be used and spills should be wiped up immediately in the appropriate way.

GCSE Chemistry Neutralisation ISA method


Hypothesis


Increasing the amount of alkali solution causes the amount of acid solution required for neutralisation to increase.


Equipment

  • Sodium Hydroxide solution
  • Phenolphthalein solution
  • Dilute hydrochloric acid
  • White tile
  • Conical flask
  • Small measuring cylinder
  • Burette and funnel

Method

First of all measure a small amount (10 centimetres cubed) of sodium hydroxide solution into the conical flask. Add 3 drops of phenolphthalein and place the conical flask onto the white tile. Using the burette, slowly add hydrochloric acid solution to the until the sodium hydroxide is neutralised. Record how much hydrochloric acid was needed to neutralise the sodium hydroxide. Repeat the process increasing the amount of sodium hydroxide solution each time.


Risk Assessment

Take care handling the chemicals - wear goggles and handle any spill appropriately. Perform the experiment standing up, keeping the area around the experiment clear of bags,coats etc. This is a low risk experiment.

GCSE Physics Time Period ISA Mass on a spring ISA


Hypothesis

The greater the mass that is attached to a spring the longer the time period will be.


Equipment

100g masses and hanger
Spring
Metre rule
Stopwatch
Clamp stand
G-clamp


Method

Fix the clamp stand to the bench using the G-clamp. Hook the spring onto the clamp stand and hang the mass hanger onto the other end of the spring. The mass hanger has a mass of 100g so this will be the first mass to be tested. Pull the mass hanger down by 3cm (as measured using the metre rule) and start the stopwatch as soon as the masses are released. Stop the stopwatch as soon as the mass has been through 10 complete oscillations (an up and a down). Add mass and repeat the process adding more mass each time.


Risk Assessment

This is a safe, low risk experiment. The only potential dangers are in the wire of the spring snap and hitting an experimenter in the eye and masses falling onto feet. To minimise these risks, wear goggles at all time and ensure that the area underneath the masses and spring is kept clear.


GCSE Biology GCSE Additional Science ISA method Fatigue


Hypothesis

The harder your muscles work, the sooner they become fatigued


Equipment

Stopwatch


Method

Sitting at a desk, resting your elbow on the desk, clench and unclench your fist once every 3 seconds. Record how long it takes before it becomes too difficult to keep doing this - this is the point where your muscles are fatigued. Rest for a short while and repeat this process, each time increasing the rate at which you're clenching and unclenching your fist.


Variables

Independent - Rate of fist clenching/unclenching
Dependent - Time for muscles to become fatigued
Control variables - Arm/hand used for fist clenching, rest time in between tests


Risk Assessment

This is a very safe, low risk experiment but might be painful. Make sure you rest your arm in between tests.

GCSE Physics GCSE Further Additional Science ISA Refraction method


Hypothesis

“When you increase the angle of incidence, you increase the angle of refraction”


Equipment

Ray box and slits
Rectangular glass block
Protractor
Ruler and pencil
Plain paper


Method

Place the glass block on the paper and draw around it. Add a normal to the diagram. Shine a narrow beam of light at the point where the normal hits the glass block. Draw 2 crosses along the incident ray and 2 crosses along the ray that leaves the block on the other side of the block. Take the glass block away and connect up the rays. Measure the angle of incidence and the angle of refraction and record in a table. Adjust the angle of incidence and repeat the process.


Variables

Independent variable: Angle of incidence (measured with a protractor)
Dependent variable: Angle of refraction (measured with a protractor)
Control variables: Width of beam, brightness of beam, colour of beam, refractive index of glass block


Risk Assessment

This is a very low risk experiment. Care must be taken to avoid burns from the ray box if it gets hot. To avoid this, keep the voltage low and turn off the ray box in between readings. 

GCSE Additional Science GCSE Chemistry ISA method Catalysts


Hypothesis

The more manganese oxide is used as a catalyst, the faster hydrogen peroxide will decompose.


Equipment

Conical flask and delivery tube
Bowl of water
Measuring cylinder (100 centimetres cubed)
Measuring cylinder (25 cm cubed)
Hydrogen Peroxide (10 vol)
Manganese oxide
Spatula
Top-pan balance
Stopwatch


Method

Pour some hydrogen peroxide (15ml) into the conical flask. Pass the delivery tube into the bowl of water underneath an upturned and filled measuring cylinder (100 cm^3). Add 0.01g of Manganese oxide to the hydrogen peroxide and start the stopwatch. Measure how long it takes for 50 cm^3 of oxygen to be produced. Repeat this process with larger masses of Manganese oxide (adding 0.01g at a time until 0.07g is added).


Risk Assessment

It is important to wear safety goggles to avoid any splashes hitting eyes. Provided goggles are worn this is a low risk experiment.